This is an exellent launcher for old clients ranging from March 2007 to December 2013.
You can download ORRH from its official Itch.io page.
(Note: Be sure to use software like 7-Zip to extract the zip of ORRH. The default windows extractor will make the launcher break.)
Due to this launcher no longer being supported by its developers, some parts may not work properly. However, these are very easy to fix.
First off, custom clothing does not work on a vanilla install of ORRH. This part will show you how to fix that.
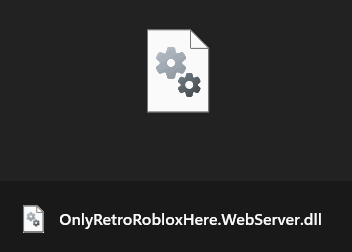
In the root folder of your install of ORRH (where the .EXE is located), look for a file called OnlyRetroRobloxHere.WebServer.dll
.
Delete this file. After deleting this file, download this file and put it in the root folder of ORRH.
This is a fixed version of this .DLL file, which lets you apply cutstom clothing IDs to your player character.
Next, User generated assets from the ROBLOX website will not load due to a security update back in 2025. Thankfully, ORRH has a feature that can fix this.
Many new ORRH users mess this up this step a lot however, so this should be descriptive enough.
First of all, you will need a long string of text called a Cookie
. I can't state this enough, but PLEASE DO NOT SHARE THIS CODE WITH ANYONE.
You will be able to get hacked if you give this out.
To get your cookie, go to the ROBLOX website and create a throwaway burner account. (Make sure it is not connected to any of your important accounts).
After you have made the account and logged in, either do the command CTRL + SHIFT + I or right click on the page and press Inspect Element.
Next, you need to find either the Application tab if you are on a Chrome-based web browser, or Storage if you are on Firefox.
You should be able to see a listing with the name .ROBLOSECURITY
. The value right next to it will be the cookie you need.

(Note: be sure to remove the warning string of text before the actual cookie in what you just copied.
So delete: _|WARNING:-DO-NOT-SHARE-THIS.--Sharing-this-will-allow-someone-to-log-in-as-you-and-to-steal-your-ROBUX-and-items.|_
)
After copying and removing the warning text, open ORRH and click on the settings tab on the left side.
in the section called ROBLOX Cookie
, paste your cookie into the empty field.
Lastly, now that you have fixed both of the issues with ORRH, you need to install the Redist and MSVC packages. These are needed for the clients to function.
In the root folder of your ORRH install, open the folder named Redist
. Inside this folder are 3 more folders. Open the folder called MSVC
.
Inside this folder are two install files. vcredist_2005_x86.EXE
, and vcredist_2008_x86.EXE
. Open both of these files and follow the install wizard.
Once you have done all of this, you are now ready to use Only Retro Roblox Here.
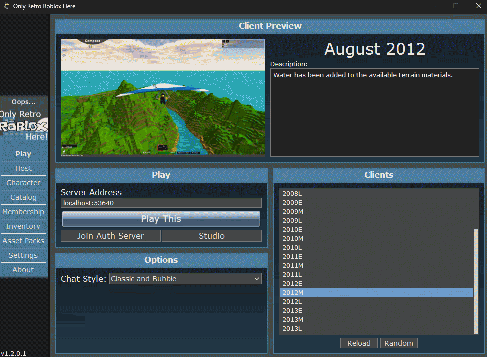
When you open the launcher, it will open the clients list and launcher. On the right side, is the list of clients. You can pick from:
(E = Early, M = Mid, L = Late)
- 2007E . . . (March 2007)
- 2007E-FakeFeb . . . (A recreation of the Feburary client, as this client has not been found.)
- 2007M . . . (August 2007)
- 2007L . . . (December 2007)
- 2008E . . . (April 2008)
- 2008M . . . (August 2008)
- 2008L . . . (December 2008)
- 2009E . . . (March 2009)
- 2009M . . . (July 2009)
- 2009L . . . (October 2009)
- 2010E . . . (Feburary 2010)
- 2010M . . . (July 2010)
- 2010L . . . (December 2010)
- 2011E . . . (April 2011)
- 2011M . . . (July 2011)
- 2011L . . . (October 2011)
- 2012E . . . (March 2012)
- 2012M . . . (August 2012)
- 2012L . . . (October 2012)
- 2013E . . . (March 2013)
- 2013M . . . (August 2013)
- 2013L . . . (December 2013)
On the left side is a Server Address bar, a Play This
button, a Join Auth Server
button, and a Studio
button.
Server Address
This Lets you join a server that is currently running. You can join servers that are running by pasting in IP addresses of the person who is hosting.
By default, it will have localhost:53640
in the field. More info on how to host servers will be down below.
Play This
Pressing this will open the client and attempt to connect to the IP address you have put in.
If you are hosting a server on your own PC, joining with localhost:53640
in the field will load you into the server you are hosting.
Join Auth Server
To be completely honest, I have no clue what this does. This isnt important for anything, so its best to ignore it.
Studio
Pressing this button will open ROBLOX studio for the version you have selected on the right side. The rest of the website will be talking about how to use ROBLOX studio.
Below are some options you can choose for your chat style.
(Note: To be completely honest, I never really change these. I usually stick with the default Classic And Bubble
chat.)
Classic
Shows the chat in the top left corner of your screen.
Bubble
Shows chat bubbles above users in-game.
Classic And Bubble
Shows the chat both in the left corner of your screen, and as chat bubbles above users in-game.
Hosting is a bit of a tricky process to learn for the first time, but this should be helpful to get you started.
First off, you will need a piece of software like Radmin or Logmein Hamachi. If your router can't port foward, these pieces of software can do it for you.
I will link the downloads for both of these.
(Note: from my personal experience and from others experience, I would recommend Radmin. Hamachi has some odd issues with having many people on a network. It is also very old, so signing in will prompt you with errors, however you are able to ignore them and move on.)
Radmin VPN
Logmein Hamachi
After you have setup and registered to one of these services, you can now host servers.
When you are ready to host a server, pick a client you want to host on in the Play tab. After choosing, go to the Host tab on the left of the ORRH launcher. On the right side is the Maps list. This will let you pick what game or map you want to host.
After clicking on what map you want to host, press the big Host
button.
This will open your server, and your server is now active and running.
Joining your own server
Once your server is up and running, go back to the Play tab. In the Server Address field, be sure it has localhost:53640
in it. It should be like this by default every time you open ORRH.
If the Server Address field is correct, press the big Play This
Button. This will open the player client, and connect you to the server.
Joining an external server
On whatever Service you are using (eg. Radmin, Hamachi), right click the user who is hosting the server.
On Radmin, click on Copy IP Address
. On Hamachi, click on Copy IPv4 Address
.
Once you have the address, go to the Play tab on ORRH. in the Server Address tab, paste in the IP you copied.
Be sure you have the same client version that the server hoster has selected.
If the Server Address field and client version is correct, press the big Play This
Button. This will open the player client, and connect you to the server.